
TL;DR
Moving your rig or mic into a closet can drastically reduce noise and reflections. Proper sealing, ventilation, and strategic placement make a small space sound professional without breaking the bank.
Imagine turning a tiny closet into a professional-sounding vocal booth or a whisper-quiet workspace. It sounds like magic, but it’s just smart planning. Most noise and echo come from reflections and leaks, not the equipment itself. You can learn more about acoustic dampening and placement techniques. And the best part? You can fix this with simple, affordable tweaks, no fancy studio needed.
This guide shows you how to make the most of small spaces—using placement, sealing, and basic acoustic tricks—so your recordings sound clear and your rig stays quiet. Whether you’re voice-overing, podcasting, or just trying to keep your PC noise contained, these tips will help you get there.
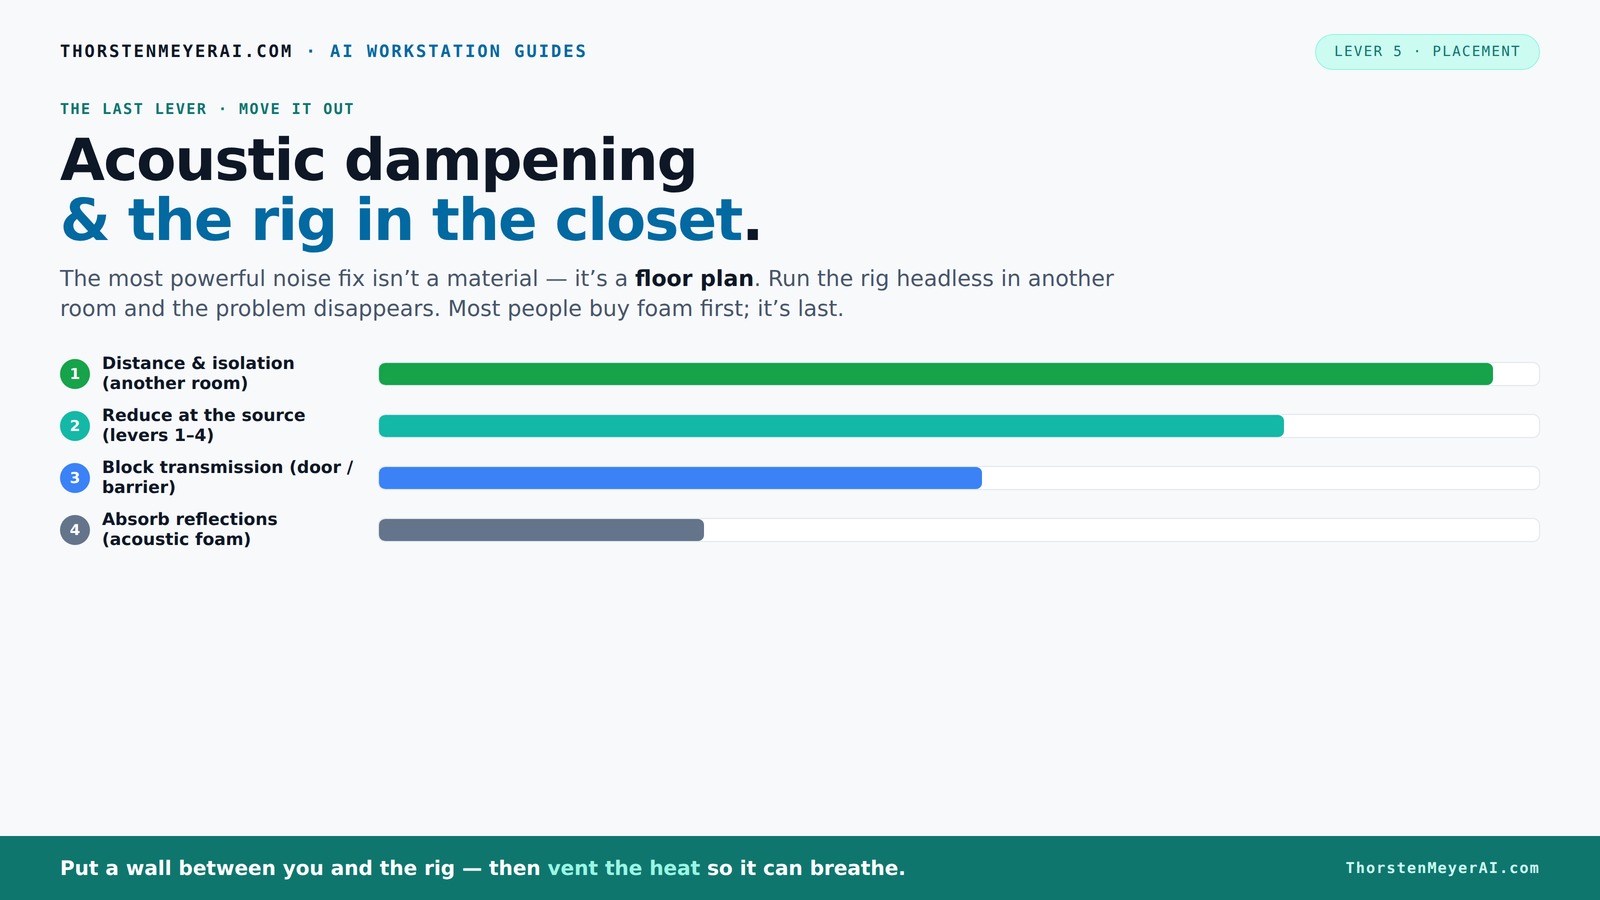
Acoustic dampening
& the rig in the closet.
The most powerful noise fix isn’t a material — it’s a floor plan. A rig you can’t hear because it’s in another room beats any amount of foam. Tap the approaches in Part 1 to see what actually works.
(another room)
(levers 1–4)
(door / barrier)
(acoustic foam)
Contain the noise, not the heat
Key Takeaways
- Moving your rig to a different room is the most effective way to cut noise, especially for AI workstations that don’t need to be local.
- Proper ventilation is critical—sealed closets trap heat and can damage your equipment. Use vents, ducts, or active cooling solutions. For more on cooling options, see reducing heat and noise in AI workstations.
- Sealing gaps around doors and outlets makes a huge difference in controlling sound leaks—don’t skip this step.
- Treat reflection points like the wall behind the mic and the ceiling to reduce echo and boxiness, using soft materials like blankets and foam.
- Budget-friendly tips like rugs, blankets, and household cushions can dramatically improve your closet’s sound quality without expensive gear.

Focusound 52 Pack Acoustic Foam Panels 1" x 12" x 12" Sound Proof Foam Panles Soundproofing Noise Cancelling Wedge Panels for Home Office Recoding Studio with 300PCS Double-Side Adhesive
Soundproofing - Acoustic foam panels triangular grooves structure for better noise absorption, helps to reduce and absorb unwanted...
As an affiliate, we earn on qualifying purchases.
As an affiliate, we earn on qualifying purchases.
Why Moving Your Setup Is the Biggest Noise Hack
When it comes to noise, distance is king. The biggest step you can take is simply putting your rig in another room. Think of your noisy machine as a roaring lion—shut it in a closet or basement, and suddenly, it’s just a distant growl.
Not everyone has a spare room, but even a closet works wonders. Imagine your laptop on your desk, chatting with a rig tucked away in a closet across the hall. The sound doesn’t travel through walls easily, and your workspace stays silent while the machine roars behind closed doors.
This method is so effective because it eliminates the problem at the source—no need for foam or barriers, just a good network connection and a ventilation plan. It’s especially perfect for AI workstations, where you mostly access the rig over the network. The tradeoff here is that you lose physical proximity, which might be necessary for some real-time audio or video work. But for many, especially remote processing tasks, this is a game-changer in noise reduction.

VEVOR Portable Vocal Booth, 6.56 ft Height, Portable Recording Studio with Travel Bag, Mobile Tablet Stand, Thickened Soundproofing, Sound Isolation Booth for Echo-Free Vocals, Podcasts, Voiceovers
Say Goodbye to Echoes: Built with durable Oxford cloth and acoustic padding, this recording booth for the home...
As an affiliate, we earn on qualifying purchases.
As an affiliate, we earn on qualifying purchases.
How 'Rig in the Closet' Can Keep Things Cool and Quiet
The 'rig in the closet' idea sounds perfect—quiet, out of sight, yet effective. But there’s a catch: heat. A fully sealed closet traps heat, turning your quiet sanctuary into an oven. That’s a big problem if you’re running a high-power GPU or CPU 24/7.
Think of your closet as a small sauna for your rig. Without proper airflow, temperatures skyrocket, and your machine throttles or fans roar louder. The trick is to give it a way to breathe—think vents, exhaust fans, or ducted airflow. Some DIY creators line closet walls with foam, then add a quiet exhaust fan that kicks in when temps rise, combining silence with cooling. The tradeoff here is balancing noise reduction with cooling efficiency; too much ducting or too many fans can introduce noise, defeating the purpose. Properly implemented, however, effective ventilation keeps your system cool without sacrificing silence, which is crucial for long-term reliability and performance.
Proper ventilation prevents heat buildup and keeps your rig healthy, letting you enjoy near-silent operation without risking overheating. If you want to learn more about cooling options, check out this guide on reducing heat and noise in AI workstations.

Audimute Soundproofing Acoustic Door Seal Kit - Door Sweep and Seal - (Standard Size)
Includes a Door Seal (3/16" x 1/2" x 25') and a Door Sweep (1/2" x 1.5" x 4').
As an affiliate, we earn on qualifying purchases.
As an affiliate, we earn on qualifying purchases.
Soundproofing a Closet: What Really Works (And What Doesn’t)
Acoustic dampening is often misunderstood. Many think foam panels are magic, but they only absorb reflections inside a room—they don’t block sound from escaping or entering. For effective soundproofing tips, see dampening and soundproofing strategies. In a small closet, the goal is to reduce echo and prevent sound leakage. Understanding this distinction helps you prioritize effective treatments and avoid wasting money on ineffective solutions.
Start by sealing gaps around the door and walls with weather stripping or foam strips. You might also find tips on acoustic sealing helpful. Cover the door with a moving blanket or foam padding for extra insulation. Inside, line the walls with foam or soft materials, focusing on reflection points like the wall behind the mic, the ceiling, and nearby hard surfaces. These treatments reduce the amount of sound bouncing around and leaking out, but they won’t make the space soundproof in the strict sense. The key is to understand that reducing echo and sound leakage involves both absorption and sealing; ignoring either limits your results. For example, sealing gaps prevents sound from escaping, while foam absorbs internal reflections, leading to clearer recordings.

Professional Studio Recording Microphone Isolation Shield, Pop Filter,High density absorbent foam is used to filter vocal. Suitable for Blue Yeti and other condenser microphones (AO-504 With Stand)
♪【The package contains】♪: Microphone Isolation Shield x 1, Metal Thread Adapter x 2 (Adapt most microphones), Adjustable Stand...
As an affiliate, we earn on qualifying purchases.
As an affiliate, we earn on qualifying purchases.
Placement Tips for the Perfect Voice or Recording Setup
Your mic’s position and the surfaces around it shape your sound more than you think. For detailed placement tips, see placement and setup advice. In a tiny closet, every hard surface reflects sound into the mic, causing that boxy, dead sound. The key is to position your mic carefully and treat the main reflection points.
Try these steps:
- Place the mic slightly off-center from the closet’s back wall—about 6-12 inches away.
- Use a small stand or boom to keep it from rattling against walls.
- Point the mic directly at your mouth, avoiding hard surfaces behind or beside you.
- Cover nearby reflective surfaces—like the desk or walls—with foam or blankets.
- Use a reflection filter if possible, to further isolate your voice.
Understanding why these steps matter: positioning the mic correctly minimizes the chance of capturing unwanted reflections, which can cause a dull, boxy sound. Using soft materials around the mic reduces the internal echo and improves clarity. Each adjustment might seem small, but collectively, they significantly enhance recording quality, making your voice sound more natural and professional.
Secrets to Treating Small Spaces Without Breaking the Bank
Big studio foam isn’t always necessary. You can make a small closet sound better with simple, affordable tricks. For more budget-friendly ideas, check out noise reduction for AI workstations. Focus on treating the main reflection points, sealing gaps, and using soft materials you already own. These strategies can dramatically improve sound quality without expensive gear, making professional-sounding recordings accessible for everyone.
Here are some budget-friendly tips:
- Use blankets or quilts on the walls and door—hang them with hooks or tape. These materials absorb sound waves and reduce internal reflections, which are the primary cause of a dull, boxy sound in small spaces.
- Place a rug or thick carpet on the floor to absorb low frequencies and reduce reflections. Low-frequency buildup can cause muddiness, and covering the floor helps tame these resonances.
- Seal every crack with weather stripping or foam tape—air leaks are sound leaks. This prevents external noise from entering and internal sound from escaping, improving overall isolation.
- Position your mic carefully, avoiding hard surfaces behind or beside it. Proper placement minimizes unwanted reflections and echoes, resulting in clearer recordings.
- Use household items like pillows or cushions to pad reflective edges. Soft, irregular surfaces scatter sound waves, reducing echo and making your recordings warmer and more natural.
Small steps, big impact. You don’t need a professional studio—just a little creativity and some soft materials. These simple modifications can turn a noisy, echoey closet into a much more controlled environment, elevating your recordings without breaking the bank.
Avoid These Common Mistakes When Turning a Closet Into a Vocal Booth
Many DIYers fall into traps that ruin their sound or damage their gear. The biggest mistake? Over-treating with foam without sealing gaps. Foam alone doesn’t stop sound leaks—gaps around the door or outlets let sound escape and noise come in. Sealing these leaks is essential because it prevents external noise from infiltrating and internal sound from leaking out, which is especially crucial in small spaces where even tiny gaps can dramatically affect sound quality.
Another common error: ignoring placement. Putting the mic right against a hard wall or reflective surface causes boxy, echo-y vocals. Proper placement involves not only distance but also considering the surrounding surfaces—keeping the mic away from reflective surfaces and using soft materials nearby to absorb echoes. Also, neglecting ventilation can lead to overheating, especially in sealed closets. Overheating can damage equipment and cause performance issues, so including airflow solutions is vital. Ensure you:
- Seal all gaps around the door and walls before adding treatment. This prevents sound leaks and external noise infiltration.
- Place the mic away from hard surfaces and reflective points. Positioning the mic correctly reduces unwanted echoes and coloration.
- Keep airflow in mind—use vents or a small fan if needed. Proper ventilation ensures your equipment remains cool and functional.
- Test and listen—adjust placement and materials until it sounds right. Fine-tuning is key to achieving optimal sound quality.
Remember, a little planning prevents a lot of rework—and keeps your gear safe. Understanding these pitfalls helps you create a more effective, durable, and high-quality setup that won’t require frequent reconfigurations or repairs.
Frequently Asked Questions
Can a closet really work as a vocal booth?
Absolutely. With proper sealing, reflection treatment, and mic placement, a closet can produce clear, professional-quality vocals. It’s a cost-effective solution for small spaces and limited budgets.What’s the difference between acoustic foam and soundproofing?
Acoustic foam absorbs reflections and reduces echo inside a space. Soundproofing blocks sound from escaping or entering. Foam won’t stop sound leaks— sealing gaps and barriers do that.Where should I place the microphone in a closet booth?
Position the mic about 6-12 inches off the back wall, aimed at your mouth, and away from hard reflective surfaces. Use soft padding around it to minimize echoes and improve clarity.Do I need bass traps in a small closet?
In tiny, enclosed spaces, bass buildup can cause boomy vocals. Placing bass traps in corners helps control low-frequency resonance, making your recordings sound more natural.How much foam or blanket coverage is enough?
Focus on the main reflection points—behind the mic, ceiling, and nearby walls. Covering 20-30% of the surface area with soft materials usually makes a noticeable difference without overdoing it.Conclusion
Transforming a small closet into a usable sound space isn’t about overdoing it with foam. It’s about strategic placement, sealing leaks, and controlling heat. When you treat the right surfaces and keep your rig cool, you turn a tiny, noisy closet into a surprisingly effective studio or quiet computer room.
Think of your closet as a blank canvas—small, simple, but capable of producing big results with the right moves. Your next step? Pick a corner, seal the gaps, and add soft materials. The quiet, professional sound is closer than you think.